Tuesday, January 31, 2012

The Last Few Days

There hasn't been a whole lot going on here the last few days. My poor girl has been sick, but I think she is finally feeling better. We were able to take her to church services on Sunday. She does have a lingering cough that is worse during the night. I think I'm going to roll up a towel to put under the head of her bed and see if that helps her out. Luckily, she hasn't had a fever since last Wednesday.

Because she hasn't been feeling well, we have been staying home for the most part. We did get out to get groceries on Monday while Daddy was at work, but haven't been out today at all. Since we were both feeling poorly last week, we decided to not go to Georgia, but postponed it to this weekend. I'm looking forward to this little mini-trip!

Yesterday didn't start out too well, but I got several packages in the mail and it helped lift my spirits. Ashley sent me a fun package with these great matryoshka doll gifts in it! Love!
I also finally got in some scrapbooking paper that I had ordered to make a few things for Chloe Jo's birthday party. Today was spent in making a Happy Birthday banner. The theme is going to be Strawberry Shortcake. How fun is this banner!?!?
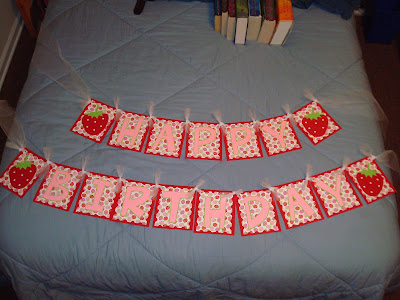
I used tulle to tie the pieces together. Thanks Pinterest for that idea!
I love it and am excited to use it....in 2 1/2 months. HA! I guess I'm an eager beaver!
Well, I need to get off of here. Some little girl has been asking to take a back with go ticks (glow sticks).

Thursday, January 26, 2012

2012 Calendar is finally done!

A few years ago my Mom gave me a calendar that she had scrapbooked. All I had to do was add a picture to each month and at the end of the year, cut the scrapbook pages out to put in a book. I loved the calendar and I was very good with keeping up with it. She gave me another scrapped calendar for 2010. I loved my calendars and I love being able to look back through the books. Mom didn't make one for me for 2011 so I did it myself and I finished putting the book together a few weeks ago and then scrapped the pages for this year. I finished the pages yesterday...just in time to enjoy the January page for a few days!

I love how it turned out and I am looking forward to adding pictures and embellishments to each month!

Wednesday, January 25, 2012

Game Night!

One of the "Family Resolutions" we have made for this year is to have at least 1 game night each month. We didn't want to make it for every week because that would just be setting ourselves up for failure. You know how life gets in the way and all! We had planned to have it Sunday night, then Monday night and neither of those worked out. We finally were able to do it last night! I love playing games and I'm loving that Chloe Jo is getting old enough to understand some games!

We played

Candyland
Uno Moo
I have to say that Uno Moo is one of my favorite games. It is fast and it is simple enough that Chloe doesn't need any help (besides with not looking when she is drawing her game pieces!). We gave this to her for Christmas and we have used it so much already!
And we played Life. Even though Chloe Jo was on a team with Daddy, she is still way too young for this game. She got very bored because it is a long game compared to Uno Moo and Candyland.
We haven't been doing much else around here. We went out Monday to shop and bank in big town and then Chloe Jo got sick that evening. She has been running a low grade fever off and on since and she is congested and coughing. I used to have bad colds every winter so it seems like she is just following in my footsteps. I hate it when she is sick! Plus, we are supposed to go to Georgia on Friday and our room is non-refundable. I hope she is well enough to go. I can't hardly stomach loosing that money!

Monday, January 23, 2012

Time to start collecting next season clothes!

Lately, I have been searching eBay and the sale racks for clothes for Chloe for the spring/summer. She has grown so much during the last few months. She was in a size 2T in September and now needs a 4T in most things. She is just getting so tall, but she isn't gaining any weight. Actually she has lost 1/2 a pound since October. I'm sure this is due to (1) her being sick during the Christmas holiday and (2) that she is so picky! Seriously, she is the pickiest eater and she would rather go without anything to eat than eat something she doesn't want. I measured and weighed her a couple of days ago.

She is 38 inches tall which makes her on the upside of the 75th percentile.
She now weighs 28 pounds putting her just above the 25th percentile.
The problem I am having with buying her some clothes for next season is the size. I've been looking for 5, 5T stuff for her to make sure the length is right, but it really irks me to have to take up every single pair of pants/shorts/skirts. Since she hasn't gained any weight, then I would have to take up 5T stuff a lot. I guess that would be fine because I can always cut the excess dart fabric off after I put the darts in. I'm just so surprised that she is in the 75th percentile for height and the 25th for weight. She is definitely a tall and skinny little thing!

Thursday, January 19, 2012

Changed my mind.

I had planned on cleaning today.

Instead I sat down and watched a movie with my princess.
I think that was a much better use of my time anyway. :)

Wednesday, January 18, 2012

My Recipe Box: Zucchini Cakes

I sure have been loving Pinterest! I have found several recipes that I want to try. I attempted a potato soup on Tuesday, but burnt the bottom so I ended up throwing it out. I will try that again tomorrow. Tonight, though, I tried a recipe for Zucchini Cakes that I found and Russ and I loved them! Chloe Jo, as usual, wouldn't touch any of them. We call her Picky Picky (like the Quimby's cat). This recipe came from this blog if you want to check it out. She actually got it from somewhere else.

This is the picture from Pinterest (well, her blog):
And this is what mine turned out looking like:
Not quite the same, but I'll explain that after sharing the recipe!

Zucchini Cakes

Ingredients:

1 large zucchini, grated
1 large egg
1 cup Panko bread crumbs
1 Tbsp Adobo spices
1/2 cup Parmesan cheese, grated

Squeeze excess liquid from the zucchini. Combine all ingredients in a large bowl and mix thoroughly. Heat a large skillet over medium heat and spray with Pam. Shape spoonfuls of batter into small patties and drop into sizzling skillet. Cook on each side for about 1 to 1 1/2 minutes or until golden brown. Finish off in oven by broiling for 2 minutes. Enjoy!

As for the red tint in my zucchini cakes...it was caused by my version of the Adobo spices. I had never heard of Adobo spices before and I couldn't find anything that said "Adobo" at the store so I googled it and found a recipe. I didn't have everything it called for so I just improvised a bit. The original recipe can be found here.

My recipe is as follows:

Adobo Spices

Ingredients:

1 oz. (one of the small containers) paprika
I didn't measure any of the rest of the ingredients. I just put in what I thought would be good and smelled nice.
Fresh ground black pepper
Garlic powder
Onion powder
Ground oregano
Cayenne Pepper

I just put all the ingredients in a container, put the lid on and shook it up. I think it turned out yummy and the cayenne gave it a nice kick!

Tuesday, January 17, 2012

How is it that my baby is turning 3!?!?

In a few short months, Chloe Jo will be turning 3! I can't believe she is already this big, but I'm looking forward to celebrating her birthday! This year is especially fun because she has been giving me input on what she would like for presents (a pink skoos bus!) and what theme she wants for her party. Right now, the theme is between:

Strawberry Shortcake
Dora the Explorer
And Elmo
I think we are leaning toward Strawberry Shortcake. Of course, she may change her mind tomorrow!

I have dreams of making her a pink, red and green tutu, a shirt with a strawberry on it and buying a pair of green and white striped leg warmers for her to wear! Oh, and of course I'm going to be making her a bow or a crown or a hat of some sort!

I have 2 more presents to buy for her (I've been getting things as I find them on sale) and I would love to find some wrapping paper with strawberries on it. I've also been looking at party supplies, but I think I'm just going to go to the Dollar Store and buy table stuff in the Strawberry Shortcake colors. And of course I'll be making a cake. I already have the cake in mind and am hoping to find a Strawberry Shortcake figure and her Cruiser to put on it. I'm so excited already about this and I don't even know if she is going to definitely go with Strawberry Shortcake, not to mention her birthday is still a couple of months away! I guess it doesn't hurt to be prepared!

Monday, January 16, 2012

Child's Apron Tutorial

I was in Kohl's last week and came across a Halloween dish towel and pot holder set clearanced for $2.79. I had been looking for a cute set to make a children's apron out of so I bought a couple of them. I saw the apron on Pinterest and had been keeping my eyes open for matching sets that I could try this with so I was very happy to find them so cheap! I did have to buy some orange thread, but used ribbon I had so I made this adorable apron for Chloe Jo for less than $4.00!
She thought it was pretty great, too! I made it a bit big so she can use it for a few years.
I'm looking forward to making something with her in the near future (who says you can't use an adorable Halloween apron all year long!?).

And because it turned out so cute and I know many of my readers sew (or aspire to sew), I decided to go ahead and blog the tutorial of how I did the apron.

I started off with the dish towel and hot pad set and a roll of ribbon.
The first thing I did was cut the part of the dish towel I wouldn't be using off. This will depend on the height of your child. I made the dish towel portion a little long so it wouldn't be too short in a year.
I then cut the ribbon. I cut a long piece to tie around the waist, 2 shorter pieces for the neck straps and a short piece to cover up the rough edges on the back of the apron. I made the short piece 12 inches long to fit a toddler. I also heat sealed the ends of each piece.
The next step is gathering the towel. I used the longest stitch length and sewed across the cut edge of the towel twice and then gathered it to be about 11 inches.
The gathered edge needs to be smaller than the shortest ribbon so that the ribbon will completely cover the rough edge. Also, make sure your gathering stitches are close to the rough edge so that the ribbon can cover them. You won't have to worry about taking the stitches out if you cover them up with the ribbon.
I pinned the ribbon to the back of the apron, making sure the ribbon covered the gather stitches.
I then changed my machine back to the normal stitch length and sewed one line across the to hold the gathers onto the ribbon.
Your apron should look like this right now.
Take the longest length of ribbon and pin it to the front of the apron, covering the gathers and stitching. Make sure the pins go through the towel and the short ribbon.
I then sewed the ribbon on, making sure to stay as close to the edges of the ribbon as I could. I just sewed it in a big rectangle the size of the short ribbon.
This is what my ribbon looked like at this point.
I then pinned the pumpkin hot pad to the ribbon and sewed it on with orange thread. I used 3 different colors of thread on this project.
Next, I pinned the remaining pieces of ribbon on the top of the hot pad and sewed them down for the neck straps.
And that was all there was to it! The apron with the green ribbon is Chloe Jo's and I made this one with the purple ribbon for my niece, Brianna.
Brianna's birthday is coming up and she asked me for an apron. Since the Halloween aprons turned out so cute, I went ahead and made her this adorable heart apron. It was basically the same process except instead of a hot pad, I used the part of the dish towel that was discarded for the Halloween aprons. I sewed it into a small square and sewed it underneath the waist ribbon instead of on top like the pumpkin hot pads.
I really enjoyed making these and will definitely be making another anytime apron for Chloe Jo!

Friday, January 13, 2012

The Bug

I've got the bug bad this week.

The crafting bug, that is.

Back on October, my Mom had sent me a kit to make a necklace, bracelet and earrings. That poor kit has been sitting on my desk just waiting for me to open it. I liked the way the jewelry looked and I had good intentions of doing it right away...I just didn't. Well, I finally got to it this week!

I love how it turned out!
I'm not much of a jewelry maker, but this project might have changed that. I really enjoyed creating these pieces.

Great. Just what I need. Another hobby. :)

Thursday, January 12, 2012

Another front door project

I love having a few fun things on the outside of our house to welcome our visitors. I have a few wind chimes, two garden flags, a stepping stone with Chloe Jo's hand prints, our outside seating and a wreath. I love wreaths and I love making my own (because wowzers...sometimes they are so expensive in the store!). I am hoping, one day, to have a wreath for each month of the year. How fun would that be?!? I think it would be super fun. Maybe I'm the only one. Of course, for that to happen, I would need a place to store my potential wreaths. Anyway, I digress. After I took the holiday stuff down, my poor front door (actually my wreaths hang beside the door, but whatev) was looking very dismal. The wreath I usually use for winter was looking shabby so it went away leaving me with no wreath for the outside of my home. Sadness.

And here enters Pinterest.

I finally did it. I caved. I am now a member of Pinterest.

It. Is. Everything. I. Knew. It. Could. Be.

To get ideas for a new front door wreath, I started perusing. I found a few that I liked, but none that I loved so I took all the inspiration and made a perfect (for me) front door wreath-like thing.
What do you all think? I love it! I love the trend of putting teal and red together so I took that and ran with it.
And I modified the felt roses that I make. I love how they came out. It was so fun putting two colors together! Plus, I made the edges wavy instead of straight and it just added so much to it!
I bought a wooden letter from the local hobby store and painted it black. It was looking a little dull so I remedied that with glitter polka dots. Too fun!
And I found the perfect ribbon to go with it. I couldn't believe my luck with the ribbon. I was expecting to have to use a plain, but nope. Hobby Lobby came through for me.
And wah-la! A unique, custom "wreath" for the outside of my home.